
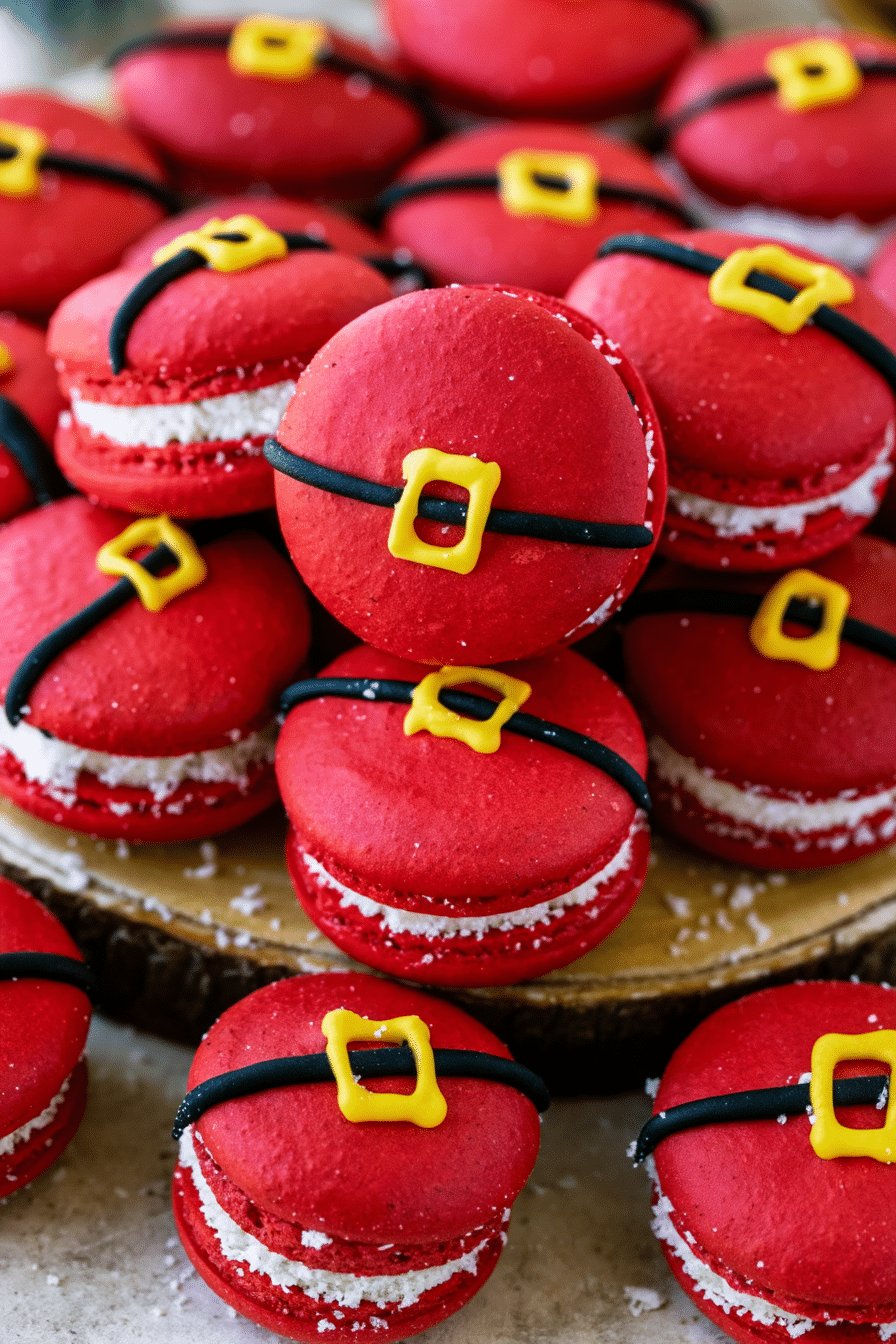
Santa Claus Macarons are a festive Christmas dessert featuring delicate almond macaron shells, creamy sugar cookie buttercream, and royal icing decorations inspired by Santa’s belt. Finished with shredded coconut around the edges, these holiday macarons bring a playful touch to Christmas cookie platters and seasonal celebrations. The shells are made with almond flour, egg whites, and powdered sugar, while the filling combines butter, vanilla, almond extract, and heat-treated flour for a sugar cookie-inspired flavor. Although macarons require careful preparation, the detailed steps help you work through the meringue, piping, baking, and decorating stages to create a special homemade holiday treat.
Why You’ll Love These Santa Claus Macarons
- Festive Christmas design: Black royal icing belts and yellow buckles turn ordinary macaron shells into miniature Santa-inspired treats.
- Sweet sugar cookie filling: The buttercream combines butter, vanilla, almond extract, and sugar for a flavor that complements the almond shells.
- A delicate texture: Properly prepared macaron shells develop smooth tops and characteristic feet when baked.
- A fun holiday baking project: Piping and decorating each shell offers an opportunity to create a personalized Christmas dessert.
- Make-ahead friendly: The recipe notes explain how to refrigerate or freeze the finished macarons, making them convenient for holiday preparation.
Santa Claus Macarons Ingredients
The recipe has three main components: macaron shells, royal icing, and sugar cookie buttercream.
Macaron Shells
- Domino Golden Sugar: Provides the sugar needed for the meringue.
- Egg white powder: An optional ingredient recommended in the recipe notes for humid climates.
- Egg whites: Form the meringue that gives macarons their structure.
- Almond flour: Creates the characteristic almond flavor and delicate texture.
- Domino powdered sugar: Combines with the almond flour to form the dry mixture for the shells.
- Red gel food coloring: The instructions specify adding approximately 1 tablespoon if using it to achieve a deep red color.
Royal Icing
- Domino powdered sugar: Forms the sweet base of the icing.
- Meringue powder: Helps the icing whip into a glossy, fluffy consistency.
- Water: Adjusts the icing to a consistency suitable for piping.
- Black gel food coloring: Creates Santa’s belt.
- Yellow gel food coloring: Adds the belt buckle.
Sugar Cookie Buttercream
- All-purpose flour: Gives the filling its sugar cookie-inspired flavor. It must be heat-treated before use.
- Unsalted butter: Creates a creamy, rich buttercream base.
- Domino Golden Sugar and powdered sugar: Sweeten the filling and contribute to its texture.
- Vanilla extract: Adds a familiar sugar cookie flavor.
- Almond extract: Complements the almond macaron shells.
- Milk or heavy cream: Helps adjust the buttercream consistency.
- Desiccated shredded coconut: Coats the edges of the assembled macarons.
Helpful Tips for Making Christmas Macarons
Measure the ingredients accurately. Macarons depend on balanced proportions, so measure the ingredients in grams where measurements are provided.
Sift the dry ingredients. Sifting the almond flour and powdered sugar together helps create a smoother mixture for the macaron shells.
Whip the meringue to stiff peaks. The recipe describes a glossy meringue with a peak that stands upright when the whisk is lifted. Avoid overwhipping, as this can contribute to problems with the finished shells.
Watch the macaron batter consistency. Fold gently at first, then press the batter against the bowl as needed to release excess air. The batter should flow slowly from the spatula, and the figure-eight test should be possible without the batter breaking.
Let the shells dry before baking. These shells need to develop a dry, firm skin before they go into the oven, particularly when using enough red food coloring to achieve a deep color. Baking before the surface dries can cause cracking.
Keep the royal icing covered. Royal icing dries quickly when exposed to air. Cover it whenever you’re not actively piping the decorations.
Heat-treat the flour for the filling. The buttercream instructions call for baking the flour before adding it to the frosting so it is suitable for use in the uncooked filling.
How to Make Santa Claus Macarons
Step 1: Prepare the Ingredients and Baking Sheets
Measure all the ingredients. Fit a large piping bag with a round tip approximately 1/4 inch in diameter. Line two baking sheets with parchment paper or silicone macaron mats.
Sift the almond flour and powdered sugar together and set aside.
Preheat the oven to 300°F. The original recipe recommends allowing a conventional oven to preheat for 60–90 minutes to help reduce temperature fluctuations. For a convection oven, it suggests starting at 270°F and adjusting as needed for your oven.
Step 2: Prepare the Meringue
Place a heatproof bowl over a pan of barely simmering water, making sure the bottom of the bowl does not touch the water.
Add the Golden Sugar and optional egg white powder, whisking to prevent clumps. Add the egg whites and continue whisking until the sugar dissolves completely. Rub a little mixture between your fingers to check for remaining sugar granules.
Transfer the mixture to a stand mixer bowl and begin whipping on low for about 30 seconds. Increase to medium and whip for another two minutes, then raise the speed to medium-high until stiff peaks form.
Look for a glossy meringue that holds its shape when the whisk is lifted.
Step 3: Make and Pipe the Macaron Batter
Add the sifted almond flour and powdered sugar to the meringue. If using red gel food coloring, add it at this stage; the recipe specifies approximately 1 tablespoon.
Fold gently with a spatula, using a J-shaped motion. Once the dry ingredients are incorporated, press the batter against the side of the bowl as you continue folding to release excess air.
Stop when the batter is glossy and flows slowly. When lifted with a spatula, it should fall in a continuous ribbon that allows you to draw several figure-eight shapes. The batter falling back into the bowl should take approximately 10–15 seconds to blend into the remaining mixture.
Transfer the batter to the piping bag. Pipe circles onto the prepared baking sheets, holding the bag vertically over each template. Tap the trays against the counter or your hand, then use a toothpick to pop visible air bubbles.
Step 4: Rest and Bake the Shells
Let the piped shells rest until their surfaces feel dry and somewhat firm. They should form a noticeable skin before baking.
Bake one tray at a time for approximately 15–20 minutes. The recipe notes that actual baking time may range from 13 to 30 minutes, depending on the oven and temperature.
The finished shells should develop feet and a deeper color. They should not jiggle when gently moved, and their tops should no longer feel soft. If they are still soft or wobbly, continue baking as needed.
Remove the shells from the oven and let them cool completely before filling and decorating.
Step 5: Make the Royal Icing
Place the powdered sugar and meringue powder in a mixer bowl. Begin mixing on low while gradually adding the water. Once combined, increase the speed to medium-high and whip for a few minutes until glossy and fluffy.
The icing should be thick but flow smoothly, similar to sweetened condensed milk. If it is too stiff, add a little more water. If it is too runny, add more powdered sugar.
Divide the icing between two bowls. Color one black and the other yellow. Transfer the black icing to a piping bag fitted with a size 3 tip and the yellow icing to a bag fitted with a size 2 tip. Keep both covered when not in use.
Step 6: Decorate Santa’s Belt
Pipe a black line across the middle of approximately half the macaron shells to create Santa’s belt.
Let the black icing dry for a few minutes. To speed up the drying process, the recipe notes that placing the shells in the refrigerator helps.
Use the yellow icing to pipe a square buckle in the center of each black belt. These decorated shells will form the tops of the finished macarons.
Step 7: Prepare the Sugar Cookie Buttercream
Preheat the oven to 350°F. Spread the flour on a parchment-lined or silicone-lined baking tray and bake for about 5 minutes, stirring partway through. Once the flour feels hot, remove it from the oven and let it cool before using.
Place the butter, Golden Sugar, and powdered sugar in a mixer bowl. Beat for 4–5 minutes until creamy and smooth.
Add the cooled, heat-treated flour, vanilla extract, and almond extract. Mix on low until incorporated. Add the milk or heavy cream if needed to adjust the consistency. If the frosting is too runny, add more powdered sugar.
Step 8: Fill and Assemble the Macarons
Transfer the buttercream to a piping bag fitted with a round tip. Pipe the filling onto the bottom shell of each macaron, then place a decorated Santa belt shell on top.
Roll the exposed buttercream edges in the shredded coconut to finish the macarons.
Serving Suggestions
Arrange Santa Claus Macarons on a Christmas dessert platter, serve them at a holiday gathering, or package them for a festive homemade dessert gift.
Their decorated tops make them especially suitable for Christmas cookie exchanges and seasonal dessert tables. Arrange them in a single layer where possible to help protect the royal icing decorations.
Frequently Asked Questions
Why do macaron shells need to rest before baking?
Resting allows the surface to dry and form a skin. The recipe emphasizes this step because the shells use a substantial amount of red food coloring, and the dry surface helps reduce the risk of cracking.
Can I leave out the egg white powder?
Yes. The recipe lists egg white powder as optional. According to the notes, it is mainly recommended for humid climates, and you can omit it without changing the other ingredients.
Why is the flour baked before making the buttercream?
The flour is heat-treated before being added to the uncooked frosting. The recipe instructs you to bake it at 350°F for about 5 minutes, stirring partway through, and then let it cool.
How should I store Santa Claus Macarons?
Store the finished macarons in the refrigerator for up to 5 days. The recipe also states that they freeze well for 1–2 months.
Can I make these macarons ahead of Christmas?
Yes. The recipe’s refrigeration and freezing guidance makes advance preparation possible. You can prepare the macarons ahead, refrigerate them for up to 5 days, or freeze them for 1–2 months.
Storage and Make-Ahead Tips
- Refrigeration: Store assembled macarons in the refrigerator for up to 5 days.
- Freezing: Freeze the finished macarons for 1–2 months, as specified in the recipe.
- Holiday preparation: Plan enough time for making the meringue, piping and resting the shells, preparing the filling, decorating, and assembling. The individual stages require attention, so allow extra time if you are making macarons for a special event.
Make Santa Claus Macarons for Christmas
Santa Claus Macarons combine delicate almond shells, creamy sugar cookie buttercream, and playful royal icing decorations in one festive dessert. With their black belts, yellow buckles, and coconut-covered edges, these homemade macarons make a charming addition to Christmas celebrations. Save the recipe for your holiday baking plans and enjoy creating a batch to share.
Print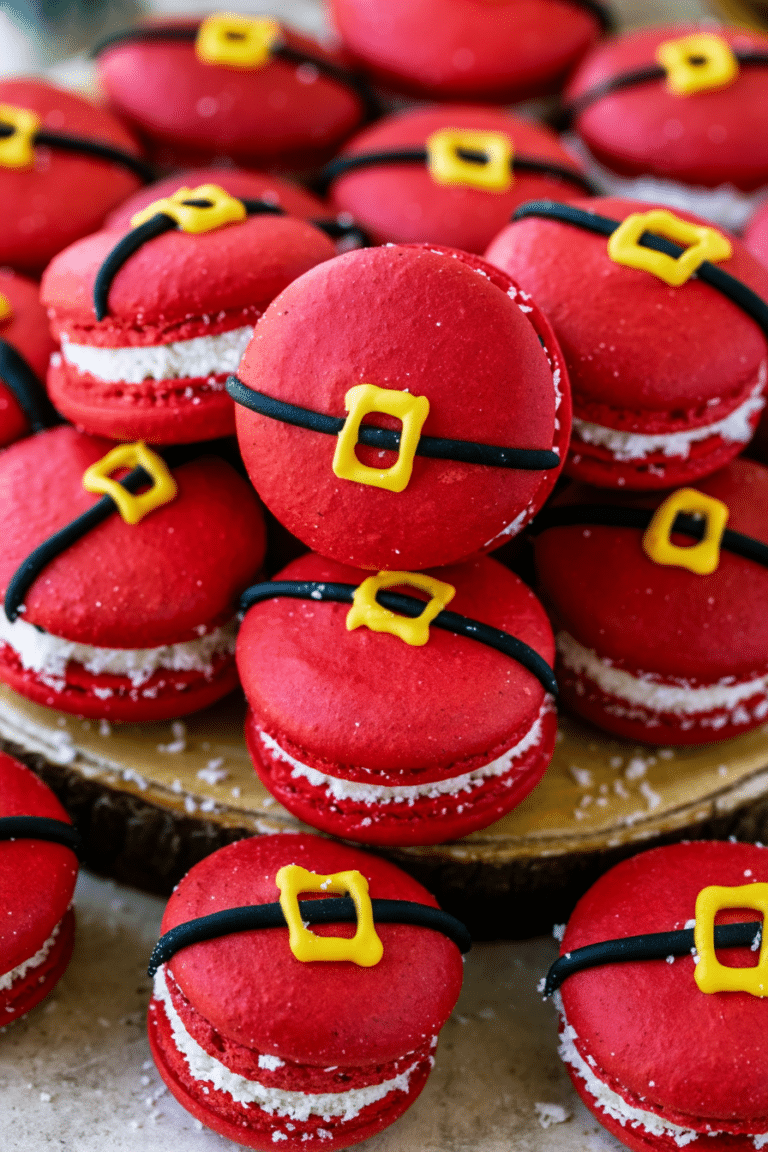
Santa Claus Macarons: Festive Christmas Macarons with Sugar Cookie Buttercream
These festive Santa Claus Macarons feature crisp red macaron shells, a delicious sugar cookie buttercream filling, and royal icing decorations inspired by Santa’s belt. Finished with shredded coconut around the edges, they make a fun Christmas dessert.
- Total Time: 1 hour 40 minutes
- Yield: 22 macarons
Ingredients
Macaron Shells
- 100 grams Domino® Golden Sugar
- 4 grams egg white powder (optional; see notes)
- 100 grams egg whites
- 105 grams almond flour
- 105 grams Domino® Powdered Sugar
Royal Icing
- 1½ cups Domino® Powdered Sugar (187 grams)
- 1 tablespoon meringue powder
- 4 tablespoons water
- 2 drops black gel food coloring
- 1 drop yellow gel food coloring
Sugar Cookie Buttercream
- ½ cup all-purpose flour (63 grams)
- ½ cup unsalted butter (113 grams)
- ¼ cup Domino® Golden Sugar (50 grams)
- 1¼ cups Domino® Powdered Sugar (156 grams)
- 1 teaspoon vanilla extract
- ⅛ teaspoon almond extract
- ½ tablespoon milk or heavy cream
- ¼ cup desiccated coconut, shredded (50 grams)
Instructions
Macaron Shells
- Prepare a large piping bag fitted with a large round tip, about ¼ inch in diameter. Line two baking sheets with parchment paper or silicone mats. Measure all ingredients. Sift the powdered sugar and almond flour together and set aside.
- Preheat the oven. The original recipe recommends preheating a large oven to 300°F for 60–90 minutes to help reduce temperature fluctuations. For a convection oven, start at 270°F and adjust as needed for your oven.
- Place a bowl over a pan of barely simmering water. Add the golden sugar and egg white powder, if using, and whisk to prevent clumping. If not using egg white powder, simply omit it.
- Add the egg whites and whisk until the sugar has completely melted, which takes a couple of minutes. Rub a little mixture between your fingers to check for sugar granules; continue whisking if any remain. Make sure the bottom of the bowl does not touch the simmering water, and do not overheat the mixture.
- Transfer the mixture to the bowl of a stand mixer. Immediately whip on low for about 30 seconds, then increase to medium and whip for another 2 minutes on medium-low. Raise to medium-high and whip until stiff peaks form. This may take about 13–15 minutes, but judge by the meringue’s appearance rather than time alone.
- Stop whipping when the meringue is glossy and forms stiff peaks that stand straight up, possibly with a slight bend at the tip. Avoid overwhipping, which can contribute to hollow macarons.
- Add the sifted powdered sugar and almond flour to the stiff meringue. Add red gel food coloring if using; the original recipe uses about 1 tablespoon to achieve a deep red color.
- Gently fold with a spatula, moving in a letter-J motion. Once the dry ingredients are incorporated, press the batter against the sides of the bowl as you fold to release some air.
- Stop folding when the batter is glossy and flows in a thick, steady ribbon. The batter falling from the spatula should allow you to draw several figure eights without breaking, and it should blend back into the bowl in about 10–15 seconds.
- Transfer the batter to the piping bag. Seal the top with a bag tie if desired to help prevent the batter from drying and escaping.
- Hold the piping bag directly above the center of each macaron template at a 90-degree angle. Apply gentle pressure for about 3–5 seconds, then pull the bag up quickly with a slight twist.
- Tap each tray against the counter or the palm of your hand several times. Use a toothpick to pop any visible air bubbles.
- Let the shells rest until they form a thick, dry skin and feel dry and somewhat firm to the touch. This is especially important when using enough food coloring to achieve a deep red color, as the shells may crack if baked before drying.
- Bake one tray at a time for about 15–20 minutes. Baking time may range from 13 to 30 minutes depending on the oven and temperature.
- The shells are ready when they have developed feet, have a deeper color, and do not jiggle when moved gently. The tops should not feel soft. Continue baking if they still jiggle or feel soft.
- Remove from the oven and bake the second tray. Let all shells cool completely before filling and decorating.
Royal Icing
- Place the powdered sugar in a mixer bowl. Add the meringue powder and begin mixing on low. Gradually add the water while mixing.
- Once combined, increase the speed to medium-high and whip for a few minutes until the icing is glossy and fluffy.
- Adjust the consistency as needed. The icing should flow like sweetened condensed milk. Add more water if it is too stiff or more powdered sugar if it is too runny.
- Divide the icing between two bowls. Color one black and the other yellow. Place the black icing in a piping bag fitted with a size 3 tip and the yellow icing in a piping bag fitted with a size 2 tip.
- Keep the icing covered whenever it is not in use so it does not dry out and form a crust.
Decorate the Shells
- Pipe a line of black royal icing across the middle of each shell to create Santa’s belt.
- Let the black icing dry for a few minutes. Placing the shells in the refrigerator helps it dry faster.
- Use the yellow icing to draw a square buckle in the middle of the belt. Decorate about half of the shells, as the remaining shells will be used for the bottoms.
Sugar Cookie Buttercream
- Heat-treat the flour by preheating the oven to 350°F. Spread the flour on a parchment-lined or silicone-lined baking tray.
- Bake the flour for about 5 minutes, stirring in between. Once the flour feels hot, remove it from the oven and let it cool before using it in the frosting.
- Place the butter and golden sugar in a mixer bowl. Beat for about 4–5 minutes until as creamy and smooth as possible.
- Add the powdered sugar, cooled heat-treated flour, vanilla extract, and almond extract. Mix on low until incorporated.
- If needed, add the milk or heavy cream. If the frosting is too runny, add more powdered sugar.
Fill the Macarons
- Transfer the buttercream to a piping bag fitted with a round tip.
- Pipe the buttercream onto a plain macaron shell and top with a decorated shell.
- Roll the sides of the assembled macaron in the shredded coconut.
Notes
- Egg white powder is optional. The recipe recommends using it in humid climates. If humidity is below 30%, you most likely do not need it.
- Oven temperatures vary. The recommended temperatures and baking times may need adjustment for your oven.
- Allow the macaron shells to dry completely and form a firm skin before baking to help prevent cracking.
- Avoid overwhipping the meringue and stop folding the batter once it reaches the correct flowing consistency.
- Keep royal icing covered when not in use to prevent it from drying out.
- The macarons keep in the refrigerator for up to 5 days and can be frozen for 1–2 months.
- The recipe yields 22 macarons.
- Prep Time: 2 hours
- Cook Time: 40 minutes
- Category: Dessert
- Method: Baking
- Cuisine: American


