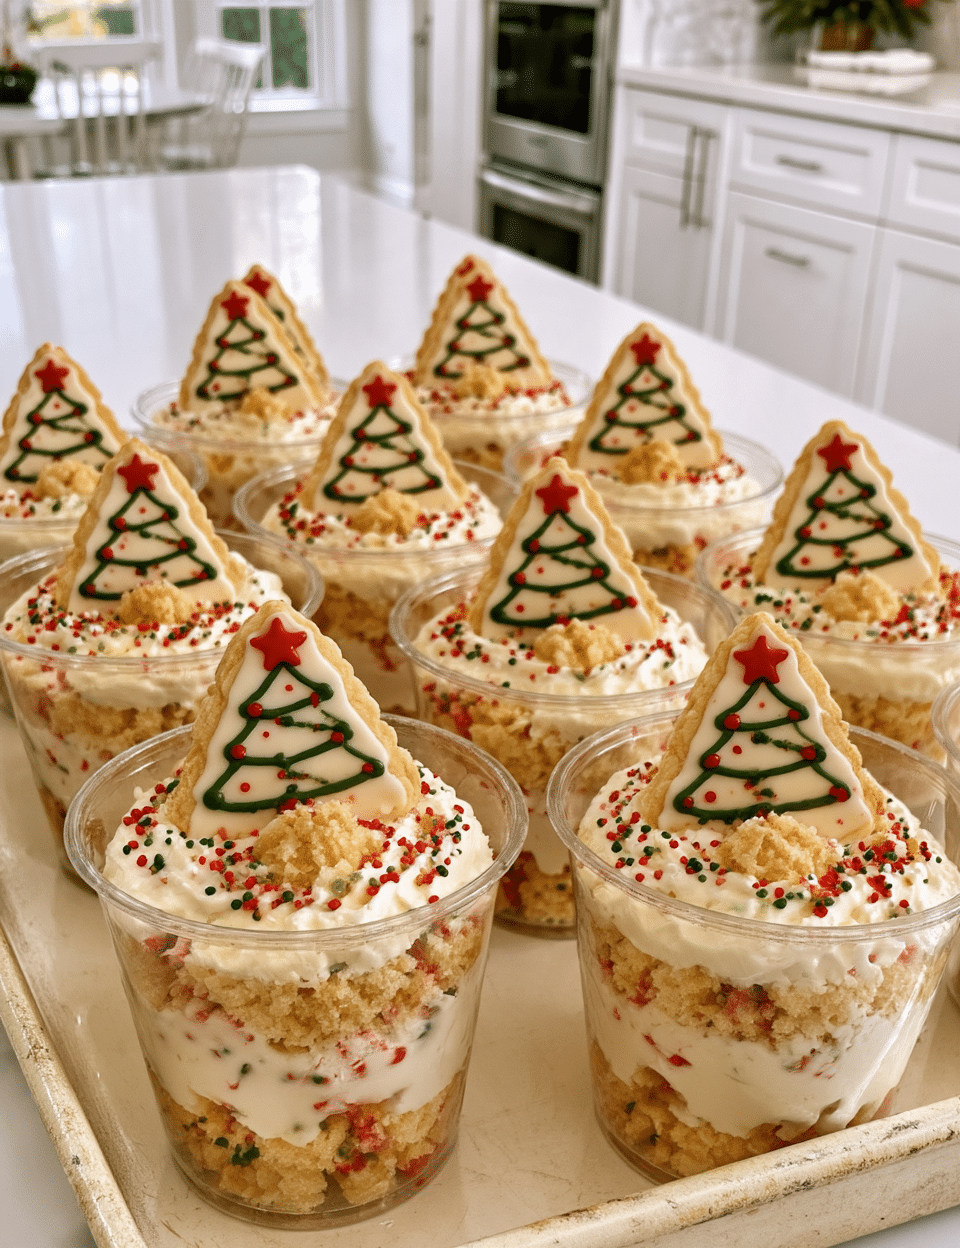
Vintage Christmas Cake Dip Cups are a fun, festive way to serve a sweet holiday dessert in individual portions. Each clear cup has layers of vanilla pound cake and a fluffy cream cheese filling, finished with vanilla wafer crumbs, red and green sprinkles, and a mini Christmas sugar cookie.
The creamy filling combines cream cheese, butter, powdered sugar, vanilla, milk, and whipped topping for a smooth, light texture. With no baking required, these Christmas dessert cups are assembled ahead of time and refrigerated until chilled. They make a pretty addition to a holiday dessert table, Christmas party, or family gathering.
Why You’ll Love These Christmas Cake Dip Cups
- No baking required: The dessert is assembled with prepared vanilla pound cake and a creamy filling.
- Individual portions: Each serving is prepared in its own clear dessert cup, making them easy to arrange and serve.
- Festive decorations: Red and green sprinkles, mini Christmas cookies, and colored icing give every cup a holiday finish.
- Creamy layered texture: Pound cake cubes are paired with a fluffy cream cheese and whipped topping mixture.
- Make-ahead friendly: The cups need at least two hours in the refrigerator before serving, so you can prepare them ahead of dessert time.
Ingredients You’ll Need
Vanilla pound cake: A 12-ounce vanilla pound cake forms the base and adds soft cake pieces throughout the dessert. Cut it into small, bite-sized cubes before assembling.
Cream cheese: Softened cream cheese gives the filling its creamy, cheesecake-style flavor and texture.
Unsalted butter: Softened butter is beaten with the cream cheese to create a smooth base.
Powdered sugar: Adds sweetness and helps create a smooth filling.
Vanilla extract: Adds classic vanilla flavor to the cream cheese mixture.
Whole milk: Gradually mixed into the filling to reach a thick, creamy consistency.
Whipped topping: Thawed whipped topping is folded into the mixture to make it light and fluffy.
Christmas sprinkles: Red and green sprinkles add festive color throughout the filling and on top of each cup.
Vanilla wafer crumbs: These create a sweet, crumbly topping for the dessert cups.
Mini vintage Christmas sugar cookies: One cookie decorates each finished serving.
Red and green decorating icing: A light drizzle of each color completes the Christmas decorations.
Clear dessert cups: Twelve 8-ounce cups show off the layers and make the dessert easy to serve individually.
How to Make Vintage Christmas Cake Dip Cups
1. Cut the Pound Cake
Remove the vanilla pound cake from its packaging and place it on a clean cutting board. Cut it into small, bite-sized cubes. Set aside ½ cup of the cake cubes for decorating.
2. Prepare the Cream Cheese Filling
Place the softened cream cheese and unsalted butter in a large mixing bowl. Beat them together with an electric mixer until smooth and creamy.
Add the powdered sugar and vanilla extract. Beat again until the mixture is fluffy and completely smooth.
Gradually pour in the whole milk while mixing on low speed. Continue mixing until the filling reaches a thick, creamy consistency.
3. Fold in the Whipped Topping and Cake
Add the thawed whipped topping to the cream cheese mixture. Use a rubber spatula to gently fold it in until the filling becomes light and fluffy.
Add 1 cup of the vanilla pound cake cubes and fold gently until the pieces are evenly distributed. Stir in the red and green Christmas sprinkles.
4. Add the First Cake Layer
Arrange the twelve clear dessert cups on a large white serving tray. Divide the remaining pound cake cubes evenly among the cups, pressing them gently into the bottoms.
Spoon a generous layer of Christmas cake dip over the cake cubes. Spread the filling evenly with the back of a small spoon.
5. Add the Second Layer
Add another small layer of vanilla pound cake cubes to each cup. Divide the remaining cake dip evenly among the dessert cups.
Pipe or spoon the filling over the second cake layer. Smooth the tops gently without pressing down on the filling.
6. Decorate the Dessert Cups
Sprinkle vanilla wafer crumbs over each cup. Add a small amount of the reserved pound cake pieces to the center, then decorate with additional red and green Christmas sprinkles.
Place one vintage Christmas sugar cookie on top of each dessert cup. Lightly drizzle the red decorating icing over the toppings, followed by a small decorative drizzle of green icing.
7. Chill Before Serving
Arrange the finished cups neatly on the serving tray and cover carefully with plastic wrap. Refrigerate for at least 2 hours, until thoroughly chilled.
Remove the tray from the refrigerator when ready to serve. Enjoy the Christmas Cake Dip Cups cold with small dessert spoons.
Tips for Making the Best Christmas Cake Dip Cups
- Soften the cream cheese and butter: Let both ingredients soften before mixing. This helps them blend into a smooth filling.
- Add the milk gradually: Pour it in little by little while mixing on low speed so you can reach the thick, creamy consistency described in the recipe.
- Fold gently: Use a rubber spatula when adding the whipped topping and cake cubes. Gentle folding helps keep the filling light.
- Keep the cake cubes bite-sized: Smaller pieces are easier to divide between the cups and scoop with a dessert spoon.
- Decorate after layering: Add the wafer crumbs, cookies, sprinkles, and icing after smoothing the final filling layer for a neat presentation.
- Allow enough chilling time: Refrigerate the cups for at least 2 hours before serving so they are thoroughly chilled.
Frequently Asked Questions
Can I make Vintage Christmas Cake Dip Cups ahead of time?
Yes. The recipe requires at least 2 hours of refrigeration before serving. You can assemble the cups, cover the tray with plastic wrap, and keep them refrigerated until they are ready to serve.
Do these Christmas dessert cups need to be served cold?
Yes. The recipe instructions specify serving the Christmas Cake Dip Cups cold, straight from the refrigerator.
Can I use another type of cake?
The supplied recipe calls for vanilla pound cake. Using a different cake would change the original recipe, so vanilla pound cake is the best choice when following these instructions.
What can I use instead of mini Christmas sugar cookies for decoration?
The recipe uses one mini vintage Christmas sugar cookie per cup. You can leave the cookies off if needed, but they are part of the original festive decoration.
How should I store leftover dessert cups?
Keep any remaining dessert cups covered and refrigerated, as directed in the recipe.
A Festive Dessert for Your Christmas Table
These Vintage Christmas Cake Dip Cups bring together soft vanilla pound cake, fluffy cream cheese filling, and colorful holiday decorations in individual servings. Prepare them ahead, chill until ready, and serve them as a festive addition to your Christmas dessert table.
Print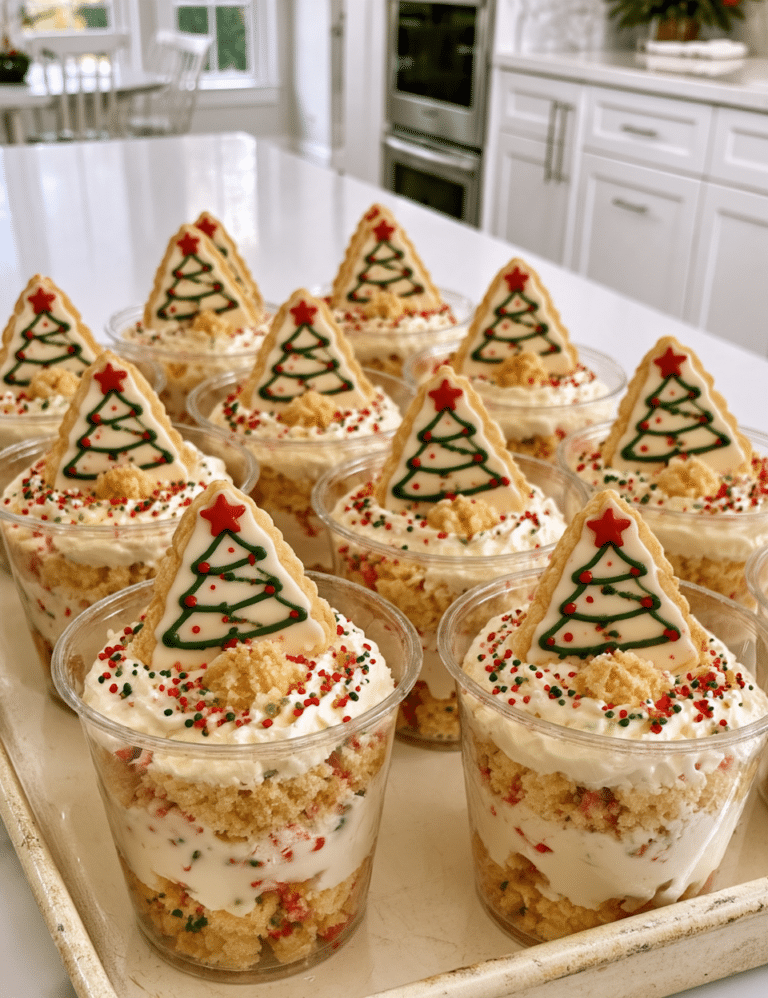
Vintage Christmas Cake Dip Cups – Easy No-Bake Christmas Dessert
Vintage Christmas Cake Dip Cups are festive no-bake desserts made with vanilla pound cake, creamy whipped cream cheese filling, Christmas sprinkles, and vanilla wafer crumbs. Each individual dessert cup is decorated with a vintage Christmas sugar cookie and red and green icing, then chilled until ready to serve.
- Total Time: 2 hours 25 minutes
- Yield: 12 dessert cups
Ingredients
Christmas Cake Dip
- 12 ounces vanilla pound cake
- 8 ounces cream cheese, softened
- 1/2 cup unsalted butter, softened
- 1 cup powdered sugar
- 1 teaspoon vanilla extract
- 1/2 cup whole milk
- 1 container (8 ounces) whipped topping, thawed
- 1/4 cup Christmas sprinkles, red and green
For Layering and Decoration
- 1 cup vanilla wafer crumbs
- 12 mini vintage Christmas sugar cookies
- 2 tablespoons red decorating icing
- 2 tablespoons green decorating icing
- 12 clear 8-ounce dessert cups
Instructions
- Prepare the pound cake: Remove the vanilla pound cake from its packaging and place it on a clean cutting board. Cut the pound cake into small bite-sized cubes. Set aside 1/2 cup of cake cubes for decorating.
- Make the cream cheese filling: Place the softened cream cheese into a large mixing bowl. Add the softened unsalted butter. Beat the cream cheese and butter together using an electric mixer until smooth and creamy.
- Add the powdered sugar and vanilla extract to the bowl. Beat again until the mixture becomes fluffy and completely smooth.
- Gradually pour in the whole milk. Mix on low speed until the filling reaches a thick, creamy consistency.
- Fold in the whipped topping: Add the thawed whipped topping to the cream cheese mixture. Gently fold it in using a rubber spatula until the filling becomes light and fluffy.
- Add 1 cup of the vanilla pound cake cubes to the filling. Fold gently until the cake pieces are evenly distributed.
- Add the red and green Christmas sprinkles. Stir gently to distribute the sprinkles throughout the cake dip.
- Assemble the dessert cups: Place the clear dessert cups on a large white serving tray. Divide the remaining pound cake cubes evenly among the dessert cups. Press the cake cubes gently into the bottom of each cup.
- Spoon a generous layer of Christmas cake dip over the cake cubes. Spread the filling evenly using the back of a small spoon.
- Add another small layer of vanilla pound cake cubes to each cup. Divide the remaining cake dip evenly among the dessert cups. Pipe or spoon the filling over the second cake layer.
- Smooth the tops gently without pressing down on the filling.
- Decorate: Sprinkle vanilla wafer crumbs over each dessert cup. Add a small amount of reserved pound cake crumbs to the center of each cup.
- Decorate each cup with additional red and green Christmas sprinkles. Place one vintage Christmas sugar cookie on top of each dessert cup.
- Drizzle the red decorating icing lightly over the toppings. Add a small decorative drizzle of green icing.
- Arrange all the finished dessert cups neatly on the serving tray.
- Chill: Cover the tray carefully with plastic wrap. Refrigerate the dessert cups for at least 2 hours until thoroughly chilled.
- Remove the tray from the refrigerator when ready to serve. Serve the Christmas Cake Dip Cups cold with small dessert spoons.
- Keep any remaining dessert cups covered and refrigerated.
Notes
- Reserve 1/2 cup of pound cake cubes for decorating the dessert cups.
- Gently fold the whipped topping into the cream cheese mixture to keep the filling light and fluffy.
- Refrigerate the assembled dessert cups for at least 2 hours before serving.
- Serve chilled with small dessert spoons.
- Keep leftover dessert cups covered and refrigerated.
- Prep Time: 25 minutes
- Cook Time: 0 minutes
- Category: Dessert, No-Bake Desserts
- Method: No-Bake